(Kotlin) Card Flip Animation으로 Flashcard 만들기
- 안드로이드 개발/Kotlin으로 어플 만들기
- 2019. 8. 15. 15:11
지난 포스팅에서 FlipView로 FlashCard 만드는 법을 알아봤는데요.
2019/08/12 - [안드로이드 개발/Kotlin으로 어플 만들기] - (Kotlin) Flip View(플립뷰)로 플래시카드 만들기
(Kotlin) Flip View(플립뷰)로 플래시카드 만들기
"어릴 적 카드 앞 면에 문제, 뒷면에 정답이 있는 카드로 공부한 기억 나시나요?" 특히, 영단어를 외우거나 퀴즈를 풀 때 정말 효율적인 방법이었죠. 이제 이 플래시카드를 어플로 만들어 보겠습니다. 저어어어엉..
hamzzibari.tistory.com
가상 디바이스에서는 아주 잘 작동했지만,
핸드폰에서는 터치해도 반응이 없는 경우가 많아서 다른 방법으로 Flashcard를 만드는 법을 알아보겠습니다.
위 방법으로 잘 되시는 분들은 저 방식을 이용하는 것이 더 편합니다.

1. animator 폴더 만들기
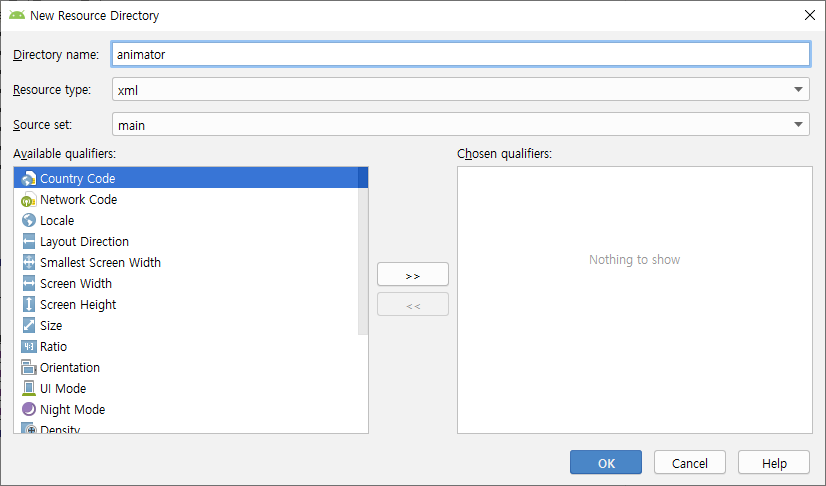
우선 res폴더 안에 animator 폴더를 만들어주겠습니다.
이전 포스팅에서 만든 menu폴더처럼
res 우클릭 > New > Android Resource Directory 클릭

Directory name은 animator, Resource type은 xml로 바꿔주고 OK
2. card flip animation (xml)
이제 animator 폴더 안에 4개의 xml 파일을 만들어줍니다.
1) cardflip_left_in.xml
<set xmlns:android="http://schemas.android.com/apk/res/android">
	<!-- Before rotating, immediately set the alpha to 0. -->
	<objectAnimator
			android:valueFrom="1.0"
			android:valueTo="0.0"
			android:propertyName="alpha"
			android:duration="0" />

	<!-- Rotate. -->
	<objectAnimator
			android:valueFrom="-180"
			android:valueTo="0"
			android:propertyName="rotationY"
			android:interpolator="@android:interpolator/accelerate_decelerate"
			android:duration="@integer/card_flip_time_full" />

	<!-- Half-way through the rotation (see startOffset), set the alpha to 1. -->
	<objectAnimator
			android:valueFrom="0.0"
			android:valueTo="1.0"
			android:propertyName="alpha"
			android:startOffset="@integer/card_flip_time_half"
			android:duration="1" />
</set>
2) cardflip_left_out.xml
<set xmlns:android="http://schemas.android.com/apk/res/android">
	<!-- Rotate. -->
	<objectAnimator
			android:valueFrom="0"
			android:valueTo="180"
			android:propertyName="rotationY"
			android:interpolator="@android:interpolator/accelerate_decelerate"
			android:duration="@integer/card_flip_time_full" />

	<!-- Half-way through the rotation (see startOffset), set the alpha to 0. -->
	<objectAnimator
			android:valueFrom="1.0"
			android:valueTo="0.0"
			android:propertyName="alpha"
			android:startOffset="@integer/card_flip_time_half"
			android:duration="1" />
</set>
3) cardflip_right_in.xml
<set xmlns:android="http://schemas.android.com/apk/res/android">
	<!-- Before rotating, immediately set the alpha to 0. -->
	<objectAnimator
			android:valueFrom="1.0"
			android:valueTo="0.0"
			android:propertyName="alpha"
			android:duration="0" />

	<!-- Rotate. -->
	<objectAnimator
			android:valueFrom="180"
			android:valueTo="0"
			android:propertyName="rotationY"
			android:interpolator="@android:interpolator/accelerate_decelerate"
			android:duration="@integer/card_flip_time_full" />

	<!-- Half-way through the rotation (see startOffset), set the alpha to 1. -->
	<objectAnimator
			android:valueFrom="0.0"
			android:valueTo="1.0"
			android:propertyName="alpha"
			android:startOffset="@integer/card_flip_time_half"
			android:duration="1" />
</set>
4) cardflip_right_out.xml
<set xmlns:android="http://schemas.android.com/apk/res/android">
	<!-- Rotate. -->
	<objectAnimator
			android:valueFrom="0"
			android:valueTo="-180"
			android:propertyName="rotationY"
			android:interpolator="@android:interpolator/accelerate_decelerate"
			android:duration="@integer/card_flip_time_full" />

	<!-- Half-way through the rotation (see startOffset), set the alpha to 0. -->
	<objectAnimator
			android:valueFrom="1.0"
			android:valueTo="0.0"
			android:propertyName="alpha"
			android:startOffset="@integer/card_flip_time_half"
			android:duration="1" />
</set>
5) integers.xml
위 코드를 보시면 @integers/card_flip_time_full, half가 보이실 거예요.
코드에서 각자 시간을 설정할 수 있지만 integers.xml에서 한 번에 관리하도록 하겠습니다.
values 폴더 안에 integers.xml을 만들고 아래 코드를 넣어주세요.
<resources>
	<integer name="card_flip_time_full">300</integer>
	<integer name="card_flip_time_half">150</integer>
</resources>
3. Layout (xml)
카드 앞 뒷 면의 레이아웃을 만들어줍니다.
이 레이아웃에서 원하는 디자인으로 바꿔줄 수 있습니다.
1) study_flip_front.xml
<RelativeLayout xmlns:android="http://schemas.android.com/apk/res/android"
                android:layout_width="match_parent"
                android:layout_height="match_parent"
                android:background="@color/orange">

	<ImageView
			android:id="@+id/image"
			android:layout_width="wrap_content"
			android:layout_height="wrap_content"
			android:contentDescription="@null"
			android:scaleType="center"
			android:layout_centerVertical="true"
			android:layout_centerHorizontal="true"
			android:src="@drawable/ic_launcher_foreground" />
	<TextView
			android:layout_width="wrap_content"
			android:layout_height="wrap_content"
			android:text="앞면입니다."
			android:layout_centerHorizontal="true"
			android:layout_below="@+id/image"/>
</RelativeLayout>
2) study_flip_back.xml
<RelativeLayout xmlns:android="http://schemas.android.com/apk/res/android"
                android:layout_width="match_parent"
                android:layout_height="match_parent"
                android:background="@color/green"
                android:orientation="vertical">

	<TextView
			android:id="@+id/text1"
			style="?android:textAppearanceLarge"
			android:layout_width="wrap_content"
			android:layout_height="wrap_content"
			android:layout_centerVertical="true"
			android:layout_centerHorizontal="true"
			android:text="뒷면입니다."
			android:textColor="#fff"
			android:textStyle="bold"/>

	<TextView
			style="?android:textAppearanceSmall"
			android:layout_width="wrap_content"
			android:layout_height="wrap_content"
			android:layout_below="@id/text1"
			android:layout_centerHorizontal="true"
			android:text="디자인을 원하는 대로 변경하세요"
			android:textAllCaps="true"
			android:textColor="#80ffffff"
			android:textStyle="bold"/>

</RelativeLayout>
3) study_flip.xml
카드 앞, 뒷면을 포함할 main layout을 만들어줍니다.
<?xml version="1.0" encoding="utf-8"?>
<RelativeLayout xmlns:android="http://schemas.android.com/apk/res/android" xmlns:tools="http://schemas.android.com/tools"
                android:id="@+id/study_flip_container"
                android:layout_width="match_parent"
                android:layout_height="match_parent"
                tools:context=".Study_Flip">
</RelativeLayout>
4. Kotlin (kt)
앞 뒷면의 레이아웃을 만들어줬으니, 거기에 대응하는 kt파일도 만들어줘야겠죠?
1) 2)는 프래그먼트로 만들어주겠습니다.
1) Study_Flip_Front.kt
class Study_Flip_Front : Fragment() {

    override fun onCreateView(
        inflater: LayoutInflater, container: ViewGroup?,
        savedInstanceState: Bundle?
    ): View? {
        return inflater.inflate(R.layout.study_flip_front, container, false)
    }
}
2) Study_Flip_Back.kt
class Study_Flip_Back : Fragment() {

    override fun onCreateView(
        inflater: LayoutInflater, container: ViewGroup?,
        savedInstanceState: Bundle?
    ): View? {
        return inflater.inflate(R.layout.study_flip_back, container, false)
    }
}
3) Study_Flip.kt
위에서 만든 xml, kt를 모두 여기서 연결해줍니다.
class Study_Flip : AppCompatActivity(), FragmentManager.OnBackStackChangedListener {

    var isShowingBackLayout = false
    override fun onCreate(savedInstanceState: Bundle?) {
        super.onCreate(savedInstanceState)
        setContentView(R.layout.study_flip)

        if (savedInstanceState == null) {
            supportFragmentManager
                .beginTransaction()
                .add(R.id.study_flip_container, Study_Flip_Front())
                .commit()
        } else {
            isShowingBackLayout = supportFragmentManager.backStackEntryCount > 0
        }

        supportFragmentManager.addOnBackStackChangedListener(this);

        val study_flip_container = findViewById(R.id.study_flip_container) as RelativeLayout
        study_flip_container.setOnClickListener {
            flipCard()
        }
    }

    override fun onBackStackChanged() {
        isShowingBackLayout = (supportFragmentManager.getBackStackEntryCount() > 0);
    }

    private fun flipCard() {
        if (isShowingBackLayout) {
            supportFragmentManager.popBackStack();
            return;
        }
        isShowingBackLayout = true;
        supportFragmentManager.beginTransaction()
            //커스텀 애니메이션
            .setCustomAnimations(
                R.animator.cardflip_right_in, R.animator.cardflip_right_out,
                R.animator.cardflip_left_in, R.animator.cardflip_left_out)
            // 뒷면으로 바뀜
            .replace(R.id.study_flip_container, Study_Flip_Back())
            // 뒤로가기 누르면 앞면을 보여줌
            .addToBackStack(null)
            .commit();
    }
}
5. 결과물
끝.
'안드로이드 개발 > Kotlin으로 어플 만들기' 카테고리의 다른 글
| (Kotlin) FlashCard의 완성, Flip & Swipe Animation (2) | 2019.08.17 |
|---|---|
| (Kotlin) 인피니티 사이클 뷰페이저(infinitecycleviewpager) 예제 (0) | 2019.08.15 |
| (Kotlin) Flip View(플립뷰)로 플래시카드 만들기 (0) | 2019.08.12 |
| (Kotlin) SearchView를 이용한 RecyclerView filter 사용하기 (2) | 2019.08.11 |
| (Kotlin) RecyclerView, OnclickListener 사용하기 (3) | 2019.08.10 |