(Kotlin) RecyclerView 사용하기
- 안드로이드 개발/Kotlin으로 어플 만들기
- 2019. 8. 4. 22:14

코틀린에서 리사이클러뷰를 사용해봅시다.
RecyclerView는 ListView처럼 리스트를 나열해주는 기능을 가지고 있는데,
ListView와는 다르게 View를 재활용하기 때문에 최적의 스크롤을 지원해준다고 합니다.
우선, Build.gradle의 dependencies에 아래 코드를 추가해주세요.
dependencies {
    implementation fileTree(dir: 'libs', include: ['*.jar'])
    implementation"org.jetbrains.kotlin:kotlin-stdlib-jdk7:$kotlin_version"
    implementation 'com.android.support:appcompat-v7:28.0.0'
    implementation 'com.android.support.constraint:constraint-layout:1.1.3'
    testImplementation 'junit:junit:4.12'
    androidTestImplementation 'com.android.support.test:runner:1.0.2'
    androidTestImplementation 'com.android.support.test.espresso:espresso-core:3.0.2'

    //리사이클러뷰
    implementation 'com.android.support:recyclerview-v7:28.0.0'
}
1. Layout (search.xml)
<?xml version="1.0" encoding="utf-8"?>
<LinearLayout
		xmlns:android="http://schemas.android.com/apk/res/android"
		xmlns:tools="http://schemas.android.com/tools"
		android:layout_width="match_parent"
		android:layout_height="match_parent"
		tools:context=".SearchActivity"
		android:orientation="vertical">
	<android.support.v7.widget.Toolbar
			android:id="@+id/toolbar"
			android:layout_width="match_parent"
			android:layout_height="wrap_content"
			android:background="@color/colorPrimary">
		<TextView
				android:layout_width="wrap_content"
				android:layout_height="wrap_content"
				android:id="@+id/set_date"
				android:text="@string/search"
				android:textSize="17sp"
				android:textStyle="bold"
				android:layout_gravity="center"
				android:textColor="@android:color/white"/>
	</android.support.v7.widget.Toolbar>
	<android.support.v7.widget.RecyclerView
			android:id="@+id/search_recyclerview"
			android:layout_width="match_parent"
			android:layout_height="match_parent">
	</android.support.v7.widget.RecyclerView>
</LinearLayout>
레이아웃에 RecyclerView를 추가해줍니다.
자바와 달리 여기서 tools:context=".SearchActivity" 을 이용하면
코틀린에서 별도의 findviewbyId를 사용하지 않고도 View를 사용할 수 있습니다.
2. Kotlin (SearchActivity.kt)
onCreate에 아래 코드를 추가합니다.
    override fun onCreate(savedInstanceState: Bundle?) {
        super.onCreate(savedInstanceState)
        setContentView(R.layout.search)
        val toolbar = findViewById(R.id.toolbar) as Toolbar
        setSupportActionBar(toolbar)
        val ab = supportActionBar!!
        ab.setDisplayShowTitleEnabled(false)
        ab.setDisplayHomeAsUpEnabled(true)

        //adapter 추가
        search_recyclerview.adapter = SearchAdapter()
        //레이아웃 매니저 추가
        search_recyclerview.layoutManager = LinearLayoutManager(this)
    }
이렇게만 넣으면 SearchAdapter 부분에 빨간 줄이 죽~~ 그이겠죠?
3. Kotlin (SearchData.kt)
SearchData.kt를 만들어줍니다.
data class SearchData(val fullname:String, val quiz:String)보여줄 데이터는 fullname과 quiz 두개입니다.
4. Layout (search_list_item.xml)
item을 보여줄 layout을 만들어줍니다. 여기서 리사이클러뷰 리스트 하나하나의 디자인을 바꿀 수 있어요.
<LinearLayout xmlns:android="http://schemas.android.com/apk/res/android"
              android:id="@+id/chat_message_item_layout"
              android:layout_width="match_parent"
              android:layout_height="wrap_content"
              android:padding="20dp"
              android:orientation="vertical">
	<TextView
			android:id="@+id/search_fullname"
			android:layout_width="wrap_content"
			android:layout_height="wrap_content"
			android:layout_marginTop="15dp"
			android:layout_marginBottom="15dp"
			android:text="제목"
			android:textSize="20sp"
			android:textColor="@color/blue"/>
	<View
			android:layout_width="match_parent"
			android:layout_height="1dp"
			android:background="@color/line_color" />
	<TextView
			android:id="@+id/search_quiz"
			android:layout_width="wrap_content"
			android:layout_height="wrap_content"
			android:layout_marginTop="15dp"
			android:layout_marginLeft="20dp"
			android:layout_marginBottom="15dp"
			android:text="내용"
			android:textSize="15sp"
			android:textColor="@color/orange"/>
</LinearLayout>
5. Kotlin (SearchAdapter.kt)
아까 빨간 줄 그인 곳을 없애줘야겠죠? 이 클래스를 만들면 없어진답니다.
빨간 줄에 Alt+Enter!

Create class 'SearchAdapter' 를 누르고,

Extract to separate file을 누르면!

이렇게 SearchAdpater 클래스가 생깁니다!
하지만 아직도 빨간 줄이 있네요..
우선 import 해준 뒤
다시 빨간 줄에 Alt+Enter

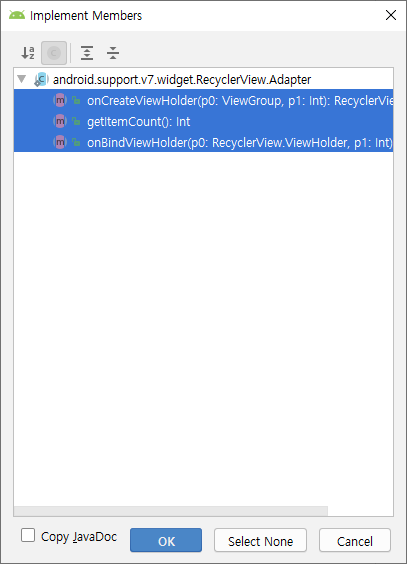
Implement members를 눌러줍니다.

ctrl을 누르고 세개 모두 클릭 해준 뒤 'OK'

짜잔~ 이제 빨간 줄은 없어졌습니다.
이제 이부분을 아래와 같이 바꿔줍니다.
class SearchAdapter : RecyclerView.Adapter<SearchAdapter.SearchViewHolder>() {


    //items MutableList, MutableList는 item을 추가할 수 있다.
    var items: MutableList<SearchData> = mutableListOf(
        SearchData("제목1", "퀴즈1"),
        SearchData("제목2", "퀴즈2"),
        SearchData("제목3", "퀴즈3")
    )

    //뷰홀더 생성
    override fun onCreateViewHolder(p0: ViewGroup, p1: Int) = SearchViewHolder(p0)

    //item 사이즈
    override fun getItemCount(): Int = items.size

    //여기서 item을 textview에 옮겨준다.
    override fun onBindViewHolder(p0: SearchViewHolder, p1: Int) {
        items[p1].let { item ->
            with(p0) {
                Fullname.text = item.fullname
                Quiz.text = item.quiz
            }
        }
    }

    inner class SearchViewHolder(parent: ViewGroup) : RecyclerView.ViewHolder(
        LayoutInflater.from(parent.context).inflate(R.layout.search_list_item, parent, false)) {
        val Fullname = itemView.search_fullname
        val Quiz = itemView.search_quiz
    }
}
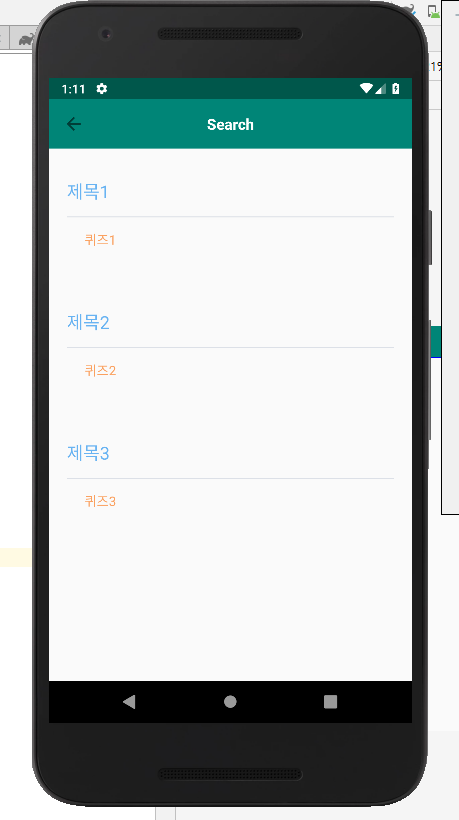
이렇게 가장 기본적인 recyclerview를 만들어 봤습니다.
다음에는 excel을 이용해서
아이템을 동적으로 불러오는 방법을 알아보겠습니다.
끝.
'안드로이드 개발 > Kotlin으로 어플 만들기' 카테고리의 다른 글
| (Kotlin) RecyclerView, OnclickListener 사용하기 (3) | 2019.08.10 |
|---|---|
| (Kotlin) Poi를 사용하여 엑셀 데이터 가져오기(2) (2) | 2019.08.07 |
| (Kotlin) Poi를 사용하여 엑셀 데이터 가져오기(1) (5) | 2019.08.06 |
| (Kotlin) Button 온클릭리스너로 Intent 이동 (0) | 2019.07.28 |
| (Kotlin) Activity에 Toolbar 만들기 (0) | 2019.07.28 |